Each month at round table we are given assignments. This month I had the on time awards and Dale was in charge of the new leader awards, the core value is Resourcefulness, so here is what I came up with.
Here is the new on time award.
and here is what I made for the new leader prizes.
Showing posts with label round table. Show all posts
Thursday, January 9, 2014
Friday, December 13, 2013
Round Table-Positive Attitude
This months core value for Round Table was Positive Attitude. You can tie so much into positive attitude, but I decided to focus on Wolf elective 13-Birds. I chose this for two reasons, 1) you have to keep a positive attitude while patiently watching for birds, and 2) because I always look at this elective and think to myself...this is too much work, and then I move on. So here is what I came up with.
A bird caller- this will not pass off anything for the wolves,but it is fun, easy and they love it. For the bears this will pass off elective 12h. This can also pass off Bear E8a.
2 large craft sticks
straw
2 thin rubber bands
1 wide rubber band
Step 1: place wide rubber band length wise on one of the craft sticks. Cut straw into small pieces (about 1 inch pieces) you will need two pieces(I did not take a picture of this it is pretty self explanatory).Step 2: Using one of the thin rubber bands, rubber band the two craft sticks together at one end.
Step 3: Place one of the straw pieces between the two craft sticks, about 1/2 inch from the edge.
Step 4: Place the other straw piece between the two craft sticks at the other end.
Step 5: Rubber band that side together using the second thin rubber band.
Now blow on the "bird caller" like a harmonica and you will have happy boys. If you wish have the boys decorate with sharpies.
Next are a few different bird feeders that you can choose to make for Wolf E13e,f
These require little time and are easy for the boys to make. The one on the left is made using pipe cleaners, the one on the right is wire (my wire was a little thicker and harder to twist together, I would definitely use floral wire next time.) I made mine into circle shapes because I didn't have to think about it.
- Wire bird feeder
- 3 pieces of Floral wire or 3 pipe cleaners for each boy
- Cheerios
- Ribbon or string
- Have each boy string cheerios onto wire or pipe cleaner and bend into a shape(circle, heart,etc)
- Link the 3 together and tie ribbon or string to top to hang in a tree.
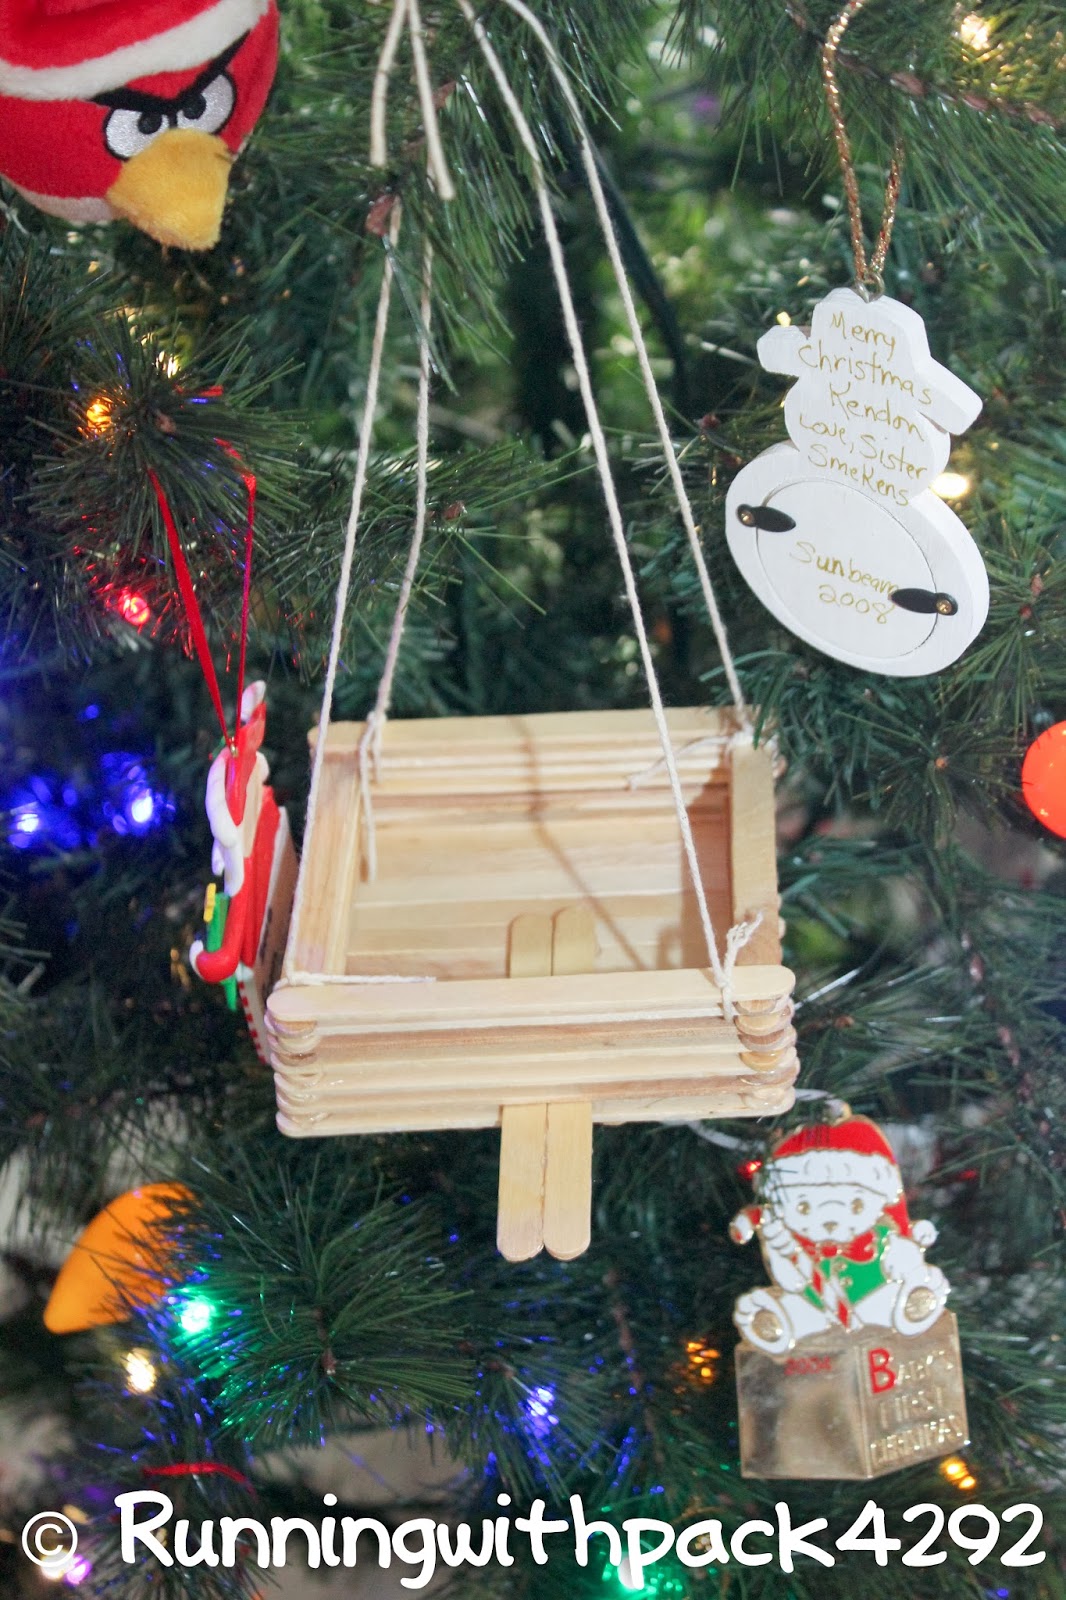
Here is the other idea for a bird feeder. Don't mind the Christmas tree, I didn't want to go back outside to take a picture it is WAY too cold. I followed THIS tutorial to make it, but instead of using a glue stick like they tell you I pulled out the glue gun. Don't get me wrong the glue stick works...eventually, but I did not have time to wait for it to dry and I am sure if you are doing it with a bunch of 8 year old boys they are not going to have the patience to wait.
Also instead of doing just two sticks along the bottom, I did four. I also was too lazy to go dig out my large craft sticks so for the perch I just used two small sticks side by side.
How about making a pair of binoculars to go along with your bird watching activity? I followed the tutorial I found HERE to make mine. Don't look to close I didn't have toilet paper rolls so I cut a wrapping paper tube apart to make mine and yes they are crooked, but it served it's purpose.
For Wolf Elective 13d , the boys have to identify birds so I found these bird cut outs and bird watching guide HERE. You can place these around the room or hide them outside for the boys to "find" and then mark off on their guide sheet. I would put my guide sheet into a sheet protector and use a dry erase marker to mark them off so you can use them again.
You could have the bears do this and make a trail mix to take on their outing, this would pass off A9e.
Edible birds nest
- 12 oz bag cow mein noodles
- 1 package butterscotch chips
- Jellybeans, m&m’s, or robin eggs(for the eggs in the nest)
- Get all your ingredients and supplies in order as you will need to form your nests quicky before they harden.
- In a large glass bowl (large enough to hold butterscotch morsels and chow mein) melt butterscotch morsels. I microwave them for about 3 1/2 minutes stopping every 30 seconds to stir the morsels.
- When butterscotch chips are melted, add the chow mein noddles and mix until noddles are evenly coated.
- Quickly using an icecream scoop, scoop out mounds of the noddle mixture and press an indent in them to form a nest shape and hold the eggs. If the mixture hardens in the bowl, microwave for 20-30 seconds to melt butterscotch again.
Thursday, November 21, 2013
Round Table-November
The first thing I taught was my Santa Advent Calendar, this is something that I have made for the last 2 or 3 years and they love it.
This will pass off Wolf A5d, 5e and Bear A20a, 10b
Here is what you will need for each one.
- 2x4
- 24 nails
- Wrapped
lifesavers(24 for each boy)
- Paint-red,
flesh color
- Googly eyes
- Medium-large
red pom-pom
- Batting
- hot glue gun
1.Cut each 2 x 4 to 36" now you need to cut an angle on either side of one end to form the "hat" (each side of the hat measures just over 3 1/2").
2.Have the boys sand the board then using a pencil mark off the area they will paint flesh color ( I just free handed it)
3.Paint the rest of the board red. Once that dries have them paint the face using the flesh color.
4.While you are waiting for the board to dry start cutting your beard, mustache, pom-pom, and brim out of batting. I just cut a shape that I thought resembled the beard and mustache and a circle for the pom-pom on top of the hat. If you want you can use these kits HERE to make the face.
5. Glue your face on. I start with the pompom, the the band, then move on from there, but however you want to do it will work.
6. From the bottom of the board measure up 1 inch and put a dot in the center, this will be your first nail hole. Now move up your board in 1 inch increments until you have made 24 marks.
7. Have each boy start hammering in his nails. Remember to pass of A5d they need to demonstrate how to use a hammer and take out a nail, so I have them pound in their first nail and then take it out. Then they can hammer all the nails into the board.
8. now poke individually wrapped lifesavers on each nail.(I poke mine on just puncturing the back plastic not all the way through).
Send them home with the boys and let them enjoy.
***ANY OF THE FOLLOWING PROJECTS WILL PASS OFF WOLF E9b, 9c
This is our snowman ice melt container that I have the boys make then take to a neighbor or elderly person in the neighborhood. I fill a gallon sized zip lock with the ice melt and then put it into the can, this way it is less messy as the boys take them home.
Here is what you will need to make one-
- #10 can
- White Spray
paint(optional)
- Felt-orange(nose),
black(mouth)
- Large
googly eyes
- Fleece for
hat- I would suggest you cut your felt before hand so it is straight (I don't have a measurement for this I just guessed)
- Gallon size ziplock bags
- ice melt
These are cute and so simple for the boys to do.
Snowman popcorn wrapper-
- http://www.whimsiedoodles.com/freebies.html (scroll down towards the bottom of the
page it will be on the right hand side) this link will let you download
the black and white version. I used photoshop to fill it in with color.
- Microwave
popcorn
- Fleece for
hats or you can use a pair of gloves
- Ribbon (to
tie hats/gloves)
Here is what you will need if you are making these
- Mason jar - quart or pint sized
- Fabric to
cover lid 6x6 inch piece for each jar
- 18 inch
piece of ribbon for each jar
- Printable
labels
I originally found the recipe and a printable tag HERE. The recipe is for a quart sized jar and I only had pint size jar so I cut the recipe in half and put it in a pint sized jar.
Here is the recipe for the quart sized jar
- 1 1/3 cup all purpose flour
1 teaspoon baking powder
1 teaspoon baking soda
1/4 teaspoon salt
1 cup quick oats
1/2 cup m&ms (I used the Red & Green Christmas ones)
2/3 cup milk chocolate chips
1/2 cup brown sugar, packed
1/2 cup white sugar
- 2/3 Cup Flour
- 1/2 tsp. baking powder
- 1/2 tsp. baking soda
- 1/8 tsp. salt
- 1/2 cup oats
- 1/2 cup m&m's
- 1/2 cup chocolate chips
- 1/4 cup brown sugar
- 1/4 cup white sugar
Layer the ingredients in the following order:
First: flour, baking powder, baking soda and salt
-
Second: oats
Third: m&ms
Fourth: chocolate chips
Fifth: brown sugar
Sixth: white sugar
I also decided to make my own tags, there are 6 different tags and they are sized differently for the two jars. There are 2 inch quart and 2 inch pint and 3 inch quart. You can glue the front and back together like I did or your can put them on the front and back of the jar.
Here is another quick and easy gift idea. Snowman ornament, how cute are these? I LOVE all things snowman. The boys could make one for themselves and one to give away.
Here is what you will need-
- Clear
glass/plastic ornament
- Marshmallows,
cotton balls, or white pom-poms
- Black and
orange vinyl or paper ( you will need glue to glue the paper on)
- Hole punch
(to punch out the eyes and mouth pieces)
- Ribbon(for
hanger)
And finally I made these travel size tissue wrappers and will put a tag on the back that says "We "tissue" a Merry Christmas and a healthy New Year"
After making them I decided it would be much faster to design a printable so I did just that. For the snowman I altered THIS free candy bar wrapper printable to work with the tissues. I designed the Santa suit. One with just the front red (to save on ink) the other that is all red.
I found my tissues in a 6 pack from the dollar store (they are princesses and toy story), so I used those as my template so make sure your packs of tissue are 4 inches tall.
Snowman (if making them
out of paper)
·
Base-4”x7” white
card stock
·
Carrot shape
nose(orange scrap of paper)
·
Scarf-1/4”x7
(color of choice)
·
Scarf “tie” ½”x 3
½” (color of choice) fold on an angle and fringe ends.
·
Hat-fleece piece
6 ½”x 4” fold up 1/2” wrap around tissue package glue along back tie top with
ribbon and fringe.
·
Small piece of
ribbon to tie hat.
Snowman (if not making
them out of paper)
·
Printable
·
Cutter
·
Same measurements
for fleece hat as above.
Santa Suit-(if making them out of paper, if not making
them out of paper you just need the printable)
·
Base-4”x 7” red
card stock
·
1”x 4” piece of
white card stock
·
Belt-1/2”x 6 ½”
piece of black card stock
·
Belt buckle- 1”x
1” piece of gold, silver, or gray cardstock. Cut slit ¼” from either side, long
enough for black ½” strip to fit in.
Don't forget about Cynthia's candy train she shared I can not get the picture to upload correctly so HERE is a link to a similar one
Friday, October 4, 2013
Core Value-Citizenship
This months core value that I was teaching at Round Table is Citizenship. When I started trying to come up with ideas to teach I thought about citizenship bingo and figured there had to be something online that was already made, so I went on a google search and found that there are some citizenship bingo games, but not exactly what I wanted so I started making my own and using different quiz's and trivia on citizenship to make what I wanted. I figured I would kill two birds with one stone, and use this not only to teach at round table, but also to use as a rotation for our pack meeting next month.(I am so ahead of the game this time).
This would have been fine, except one night I was lying in bed and the thought came to me to make a citizenship bingo game that actually passes off something. So the next day I pulled out the wolf and bear book and went through the section on the flag and citizenship. I took everything from both books that the boys had to know and turned them into questions and put the answers on the bingo board.
You can elaborate on any of the questions and teach them more if you like as you play.
When played this will pass off Wolf A2b(part) A2d, and Bear A3e.
I made 15 pages of cards with 2 cards on each page (30 cards total and they all answers in different boxes so not everyone gets bingo at the same time). To get the bingo cards you can download them HERE or email me or leave comment with your email address and I will send them to you.
I also made these flag ceremony badges to help the boys when they are doing flag ceremony.
I used the id badges and one side put the opening flag ceremony and on the other side I did the closing flag ceremony. You can make one for each boy or just make one and clip it on their shirt or hang it on a lanyard for them to use during flag ceremony.
The printable is sized for use with the id holders from Walmart(I am pretty sure they are Walmart brand it didn't really have a brand name on the container). Download the printable HERE. It was being tempermental for me and looked funny in the download box, but when I downloaded it, it opened just fine, but if it doesn't work for you email me or leave a comment with your email address and I will be glad to send it to you.
*These are for personal use only, you may not sell, claim or alter. Please link back to this post if you use/share these ideas.
I also made these flag ceremony badges to help the boys when they are doing flag ceremony.
I used the id badges and one side put the opening flag ceremony and on the other side I did the closing flag ceremony. You can make one for each boy or just make one and clip it on their shirt or hang it on a lanyard for them to use during flag ceremony.
The printable is sized for use with the id holders from Walmart(I am pretty sure they are Walmart brand it didn't really have a brand name on the container). Download the printable HERE. It was being tempermental for me and looked funny in the download box, but when I downloaded it, it opened just fine, but if it doesn't work for you email me or leave a comment with your email address and I will be glad to send it to you.
*These are for personal use only, you may not sell, claim or alter. Please link back to this post if you use/share these ideas.
Thursday, June 13, 2013
Round Table New Leader Handout
Not only am I a den leader I also teach round table and this month I was in charge of the new leader handouts. We tare taking off next month so we are covering two core values...honesty and courage.So here is what I did.
Subscribe to:
Posts (Atom)